How to Create a GST Invoice: A Step-by-Step Screen Guide

Creating a GST-compliant invoice shouldn't mean juggling a calculator, a customer register, and a stock list at the same time. This guide walks through every screen you'll touch, in the order you'll touch them, so you can raise your first invoice with confidence.
Screen 1: Start a New Invoice
When you open a new invoice, you land on a single screen built around two panels — customer details on one side, product entry on the other:
- Search or add a customer. Start typing a name or phone number to pull up an existing customer, or add a new one on the spot without leaving the invoice.
- Product search bar. A search box sits front and center so you can jump straight to the item you're billing, without scrolling a long list.
- Product categories. Below the search bar, categories let you browse by type instead of searching by name — useful when you don't remember the exact product name.
- Save, print, and payment method. Once the invoice is ready, choose how the customer is paying, then save or save-and-print in one step.
- Notes. A free-text field for anything that needs to travel with the invoice — delivery instructions, a reference number, or terms specific to that sale.
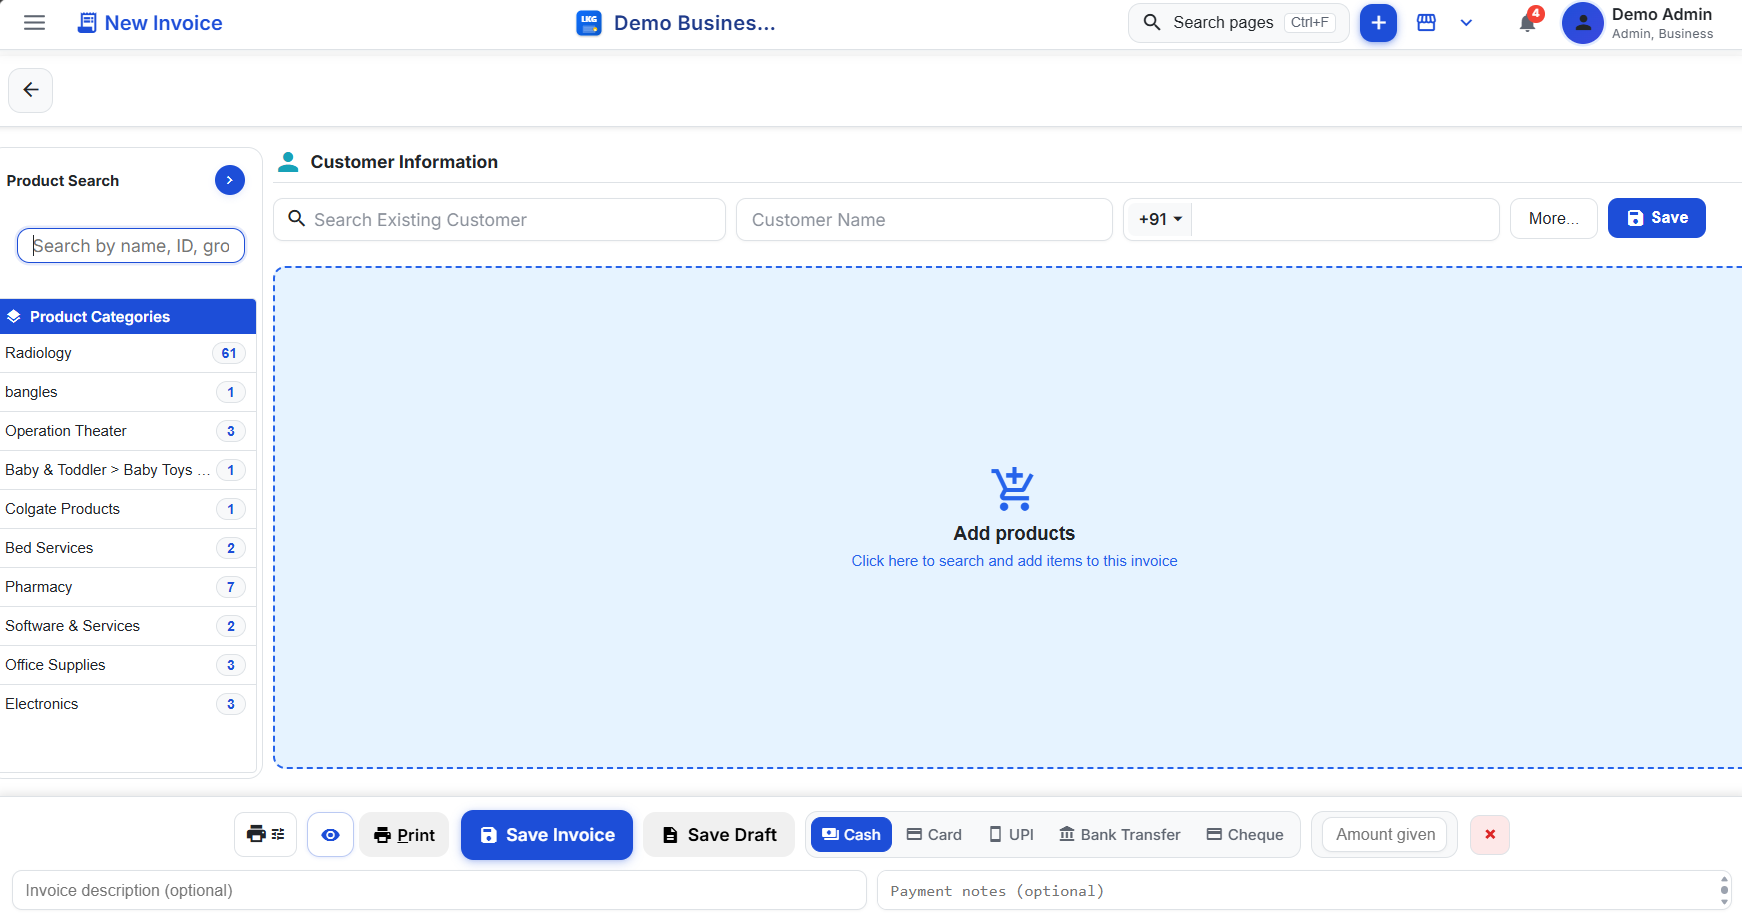
This is the screen you'll return to every time, so it's worth getting comfortable with — customer selection and product entry both happen right here, without switching pages. If the customer is new, adding them here also means their details are saved for next time — you won't need to type their name and GSTIN again on their next visit.
Screen 2: The Product Search Panel
Clicking into product search opens a dedicated panel designed for speed when you're billing item by item:
- Search bar at the top for typing a product name, code, or partial match.
- Product cards show each item with its price and a stock status badge — green for Available, yellow for Low, and red for Critical — so you know at a glance whether you can fulfil the quantity being asked for.
- Category list down the side lets you filter to a specific product group instead of scrolling the full catalog.
- Collapse panel when you're done, so the line-item table takes up the full screen again.
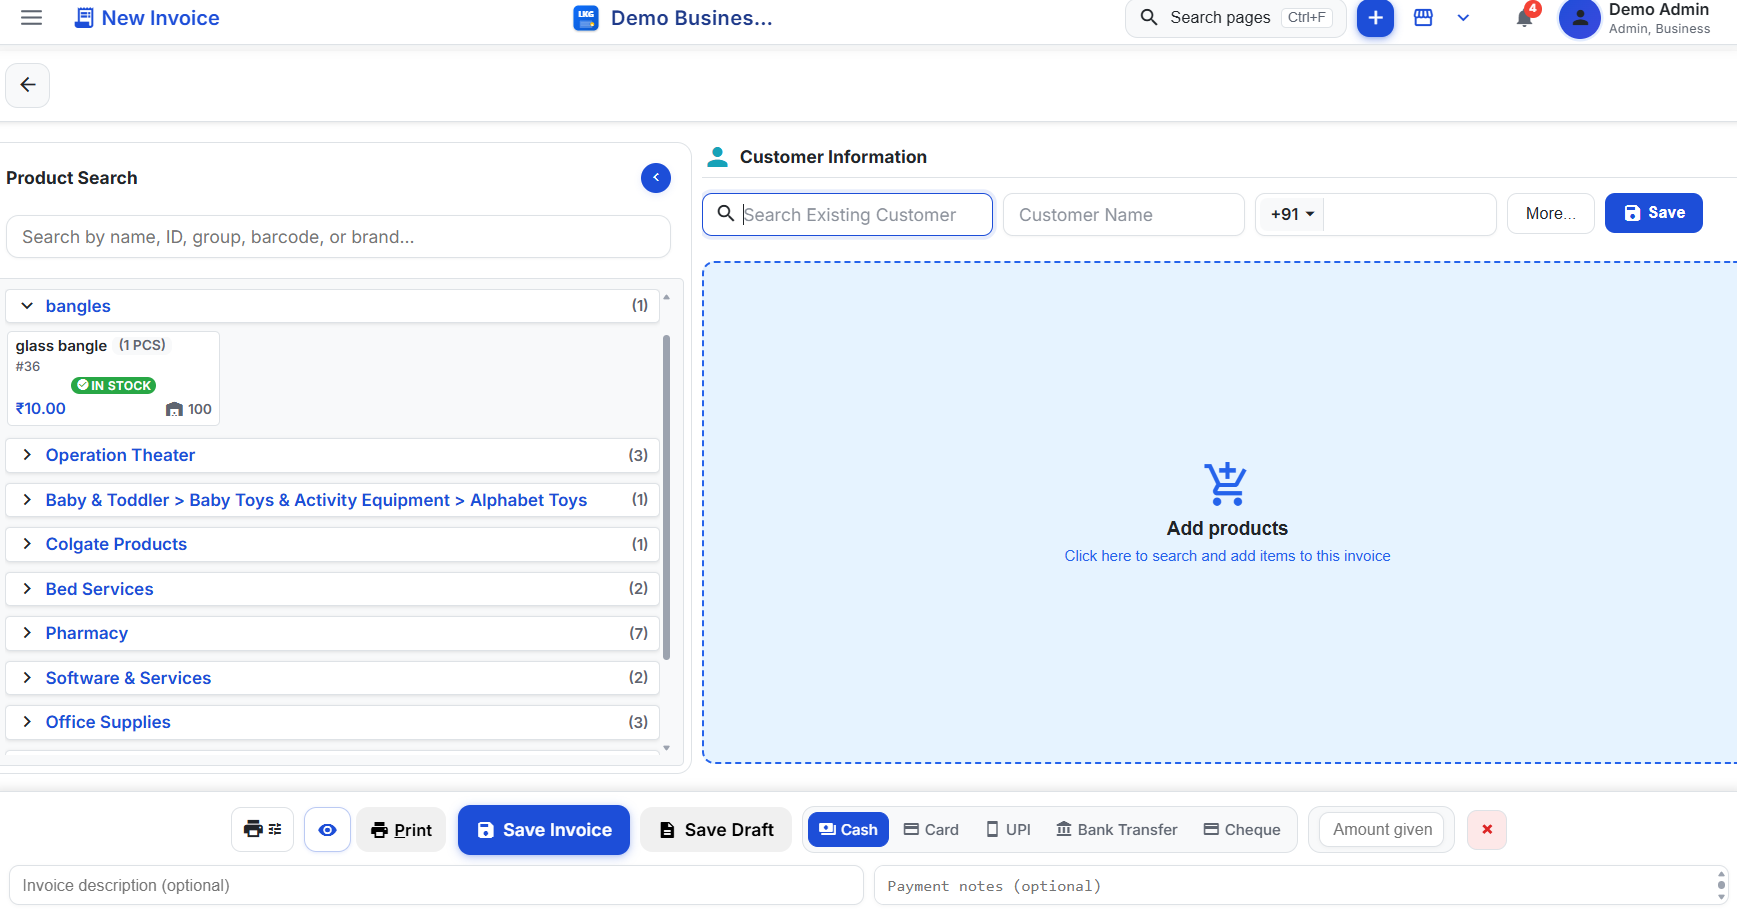
The stock badges matter more than they might look — they're the same signal used across the product catalog, so you're never billing an item that's already run out without knowing it.
Screen 3: Line Items and Totals
Once products are added, each one becomes an editable row:
- QTY and discount are editable inline — adjust either without opening a separate dialog.
- Subtotal, GST, and extra charges are calculated live as you edit, so the total on screen is always the total that gets saved.
- Draft vs. saved status is shown clearly, so you always know whether an invoice is still being worked on or has been finalized.
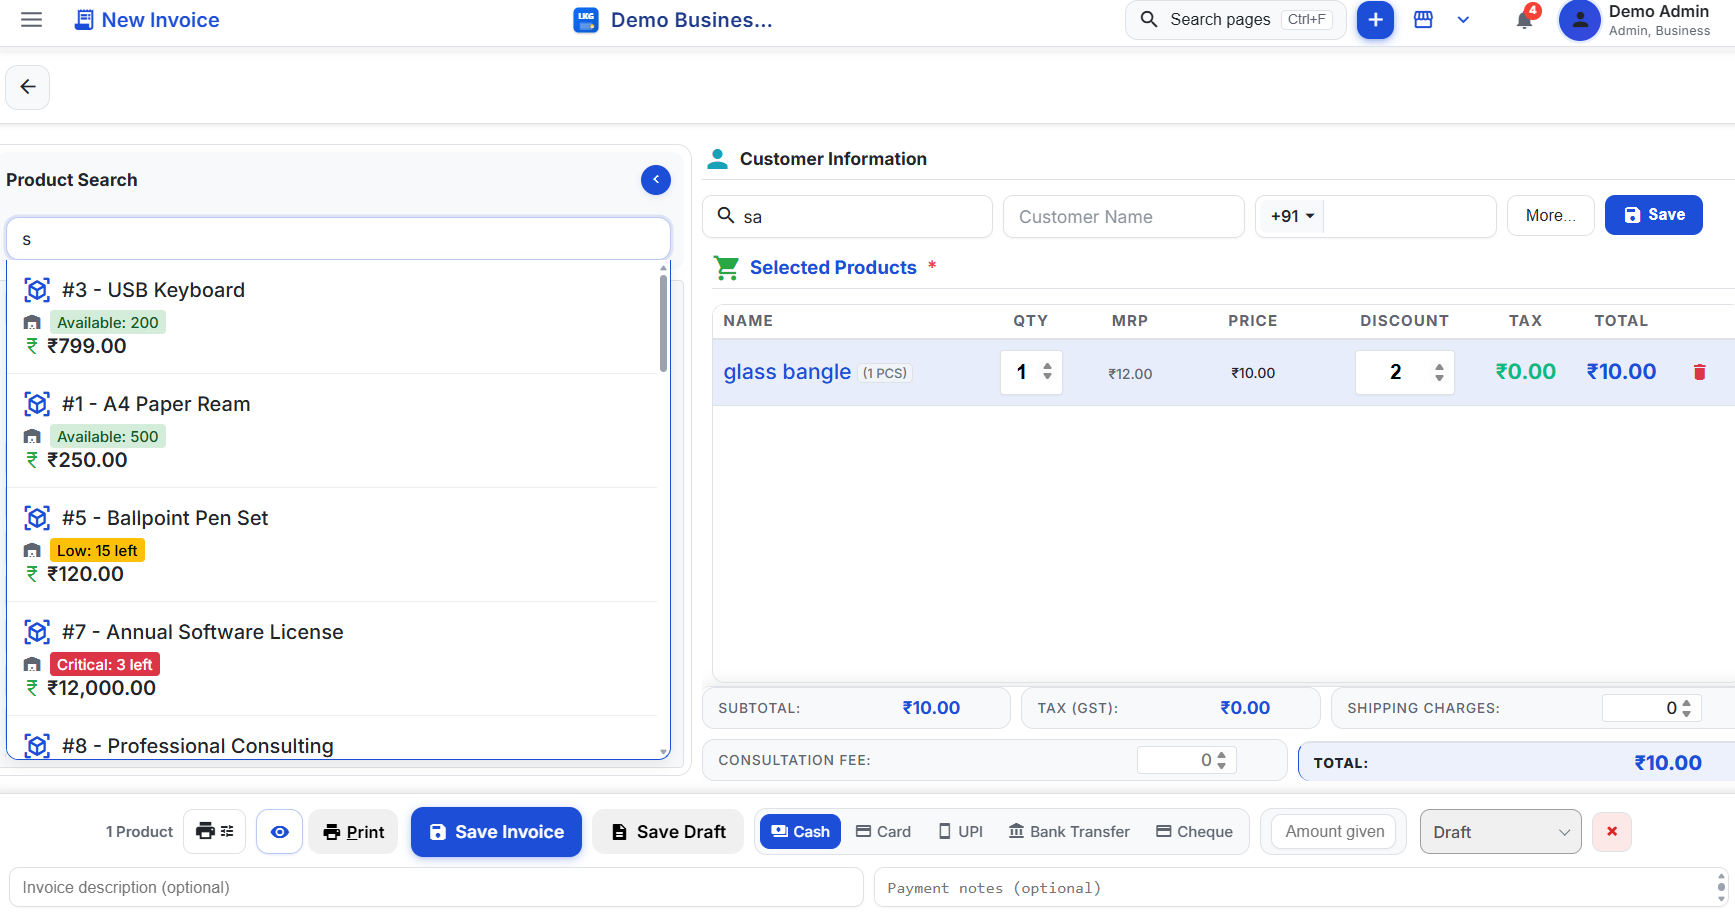
This is also where GST is applied automatically per line item, based on the HSN code and tax rate attached to each product — you don't need to calculate CGST, SGST, or IGST by hand. Whether the sale is intra-state or inter-state is also handled automatically, so you never have to remember to switch between a CGST/SGST split and IGST depending on which state the customer is in. For more on what makes an invoice GST-compliant in the first place, see the invoice overview docs.
The draft-vs-saved distinction is more useful than it looks on a busy day. You can start an invoice, get pulled away by another customer, and come back to finish it later without losing the line items already entered — it simply sits as a draft until you save it for good.
Screen 4: Excel Mode for Power Users
If you're billing dozens of invoices a day, clicking through cards for every line item adds up. Excel mode is the spreadsheet-style alternative: type a product name, use arrow keys and Enter to confirm the match, then tab across QTY, discount, and unit price the same way you would in a spreadsheet.
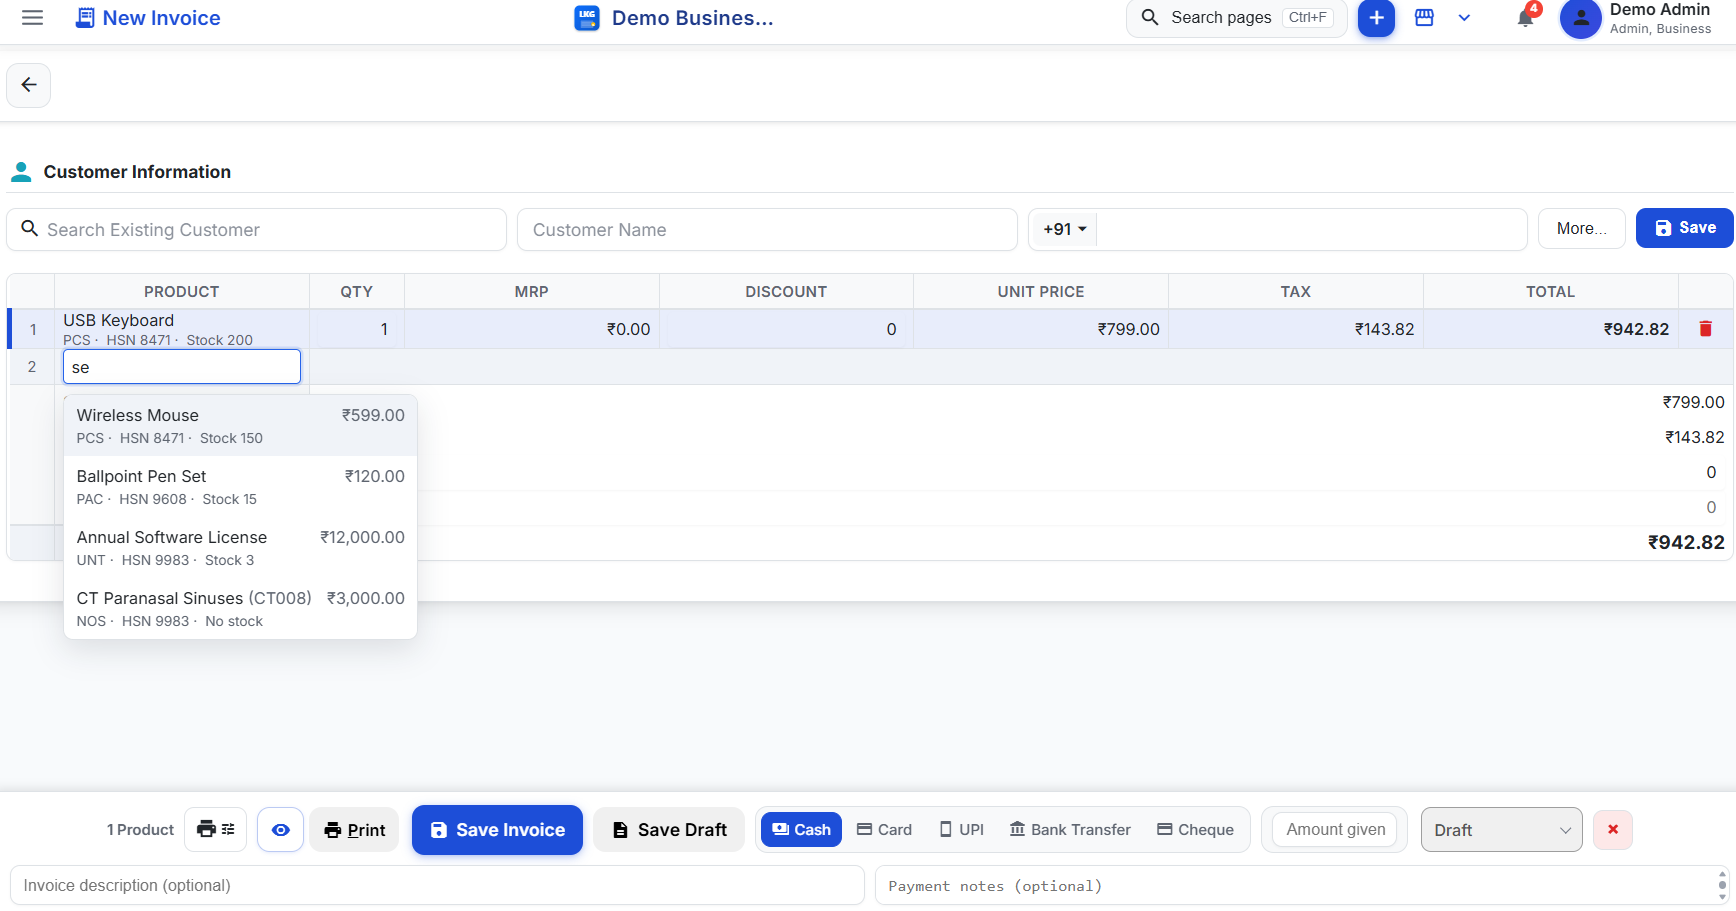
It's built for retail counters and high-volume billing days where every second between customers counts — no mouse required once you're in the flow.
Both entry styles write to the exact same invoice — you can start a bill in the regular product panel and finish the remaining lines in Excel mode, or switch back and forth depending on how busy the counter is at that moment. Neither is a separate, limited "quick bill" mode; both produce the same fully GST-compliant invoice on save.
Free to Start, No Credit Card Needed
You don't need a paid plan to try this end to end. LKG for Billing's offline plan is free forever — ₹0, no credit card, no expiry — with 10 invoices a month, 10 customers, 20 products, and unlimited users on the same LAN. Prefer the cloud? There's a free 30-day cloud trial with the same limits. Compare plans on the pricing page or head straight to download to get started.
See It Live
Reading through the steps is one thing — seeing them is another. Head to the interactive Screen Guides page, where the same invoice flow is broken down with hoverable, numbered callouts on real screenshots.
Related reading
- How to Add a Product: A Step-by-Step Screen Guide
- Easy Billing Software: Create an Invoice Fast
- GST Billing Software: The Complete Guide for 2026
- Invoice documentation
Ready to try it yourself? Download LKG for Billing and create your first GST invoice in minutes.