How to Add a Product to Your Catalog: A Step-by-Step Screen Guide

Before you can bill a single invoice, your products need to exist in the catalog. This guide walks through the two screens that make up product creation in LKG for Billing, so your catalog is set up right the first time.
Screen 1: Core Product Details
The first screen focuses on the essentials — the fields that make a product findable and billable:
- Category. Choose an existing category or create a new one on the spot. Categories are what let you browse and filter products later, both in the catalog and in the product search panel while billing.
- Name. The product's display name — this is what shows up in search results and on the invoice line item.
- Unit. The unit of measure the product is sold in — pieces, kilograms, litres, boxes, whatever fits how you actually sell it.
- Quantity. The opening stock quantity, so stock tracking starts from an accurate baseline the moment the product is saved.
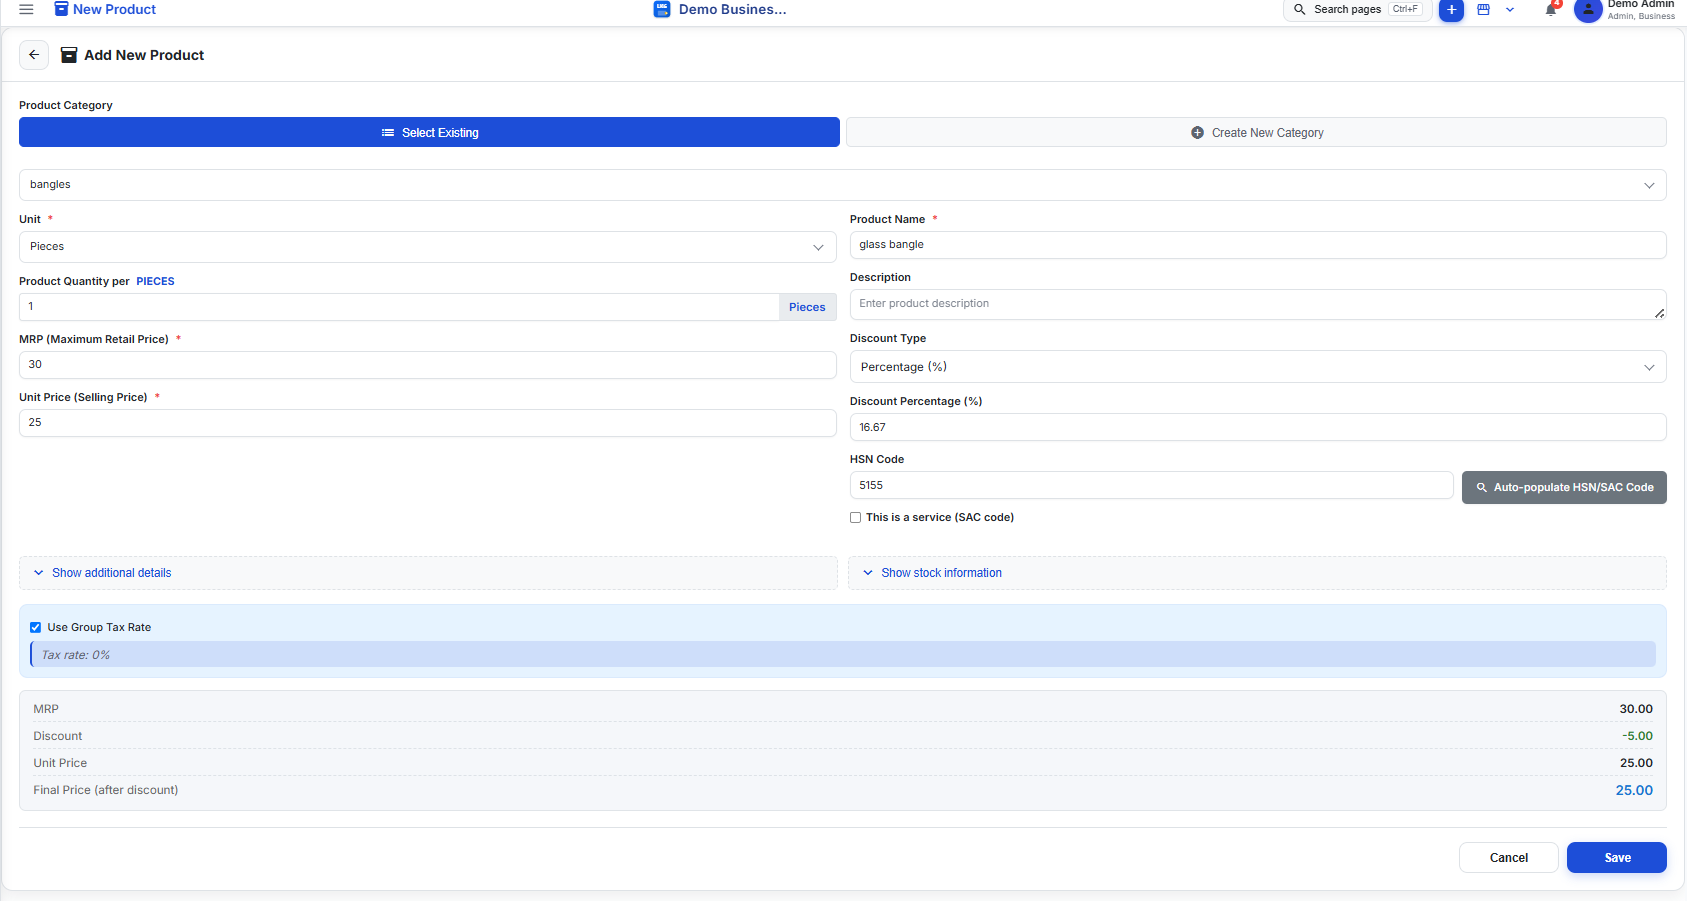
Getting the category right at this stage matters more than it seems — it's what powers the product groups view and category filters you'll rely on later when the catalog grows past a handful of items. If you sell items that don't cleanly fit an existing category — a new supplier's range, a seasonal line — creating a fresh category takes seconds and keeps the rest of your catalog from turning into a single unsorted list.
The unit field is worth a second thought too. Choosing "pieces" for something you actually sell by weight, or "box" for something sold individually, causes small but persistent mismatches between what's on the invoice and what left the shelf. Setting it correctly once here means every quantity entered later — on invoices, purchase bills, and stock adjustments — means the same thing.
Screen 2: Additional Details
The second screen covers everything that determines what the customer actually pays and how the product behaves on a GST invoice:
- Pricing. Set the selling price for the product — this is what pre-fills on every invoice line item once the product is picked.
- Discount. An optional default discount that applies automatically when the product is billed, saving you from typing the same discount on every invoice.
- HSN code. The HSN code attached here flows into every invoice automatically, which is what keeps your invoices GST-compliant without retyping the code each time.
- Extras before saving. Any remaining details specific to the product, reviewed one last time before you save it into the catalog.
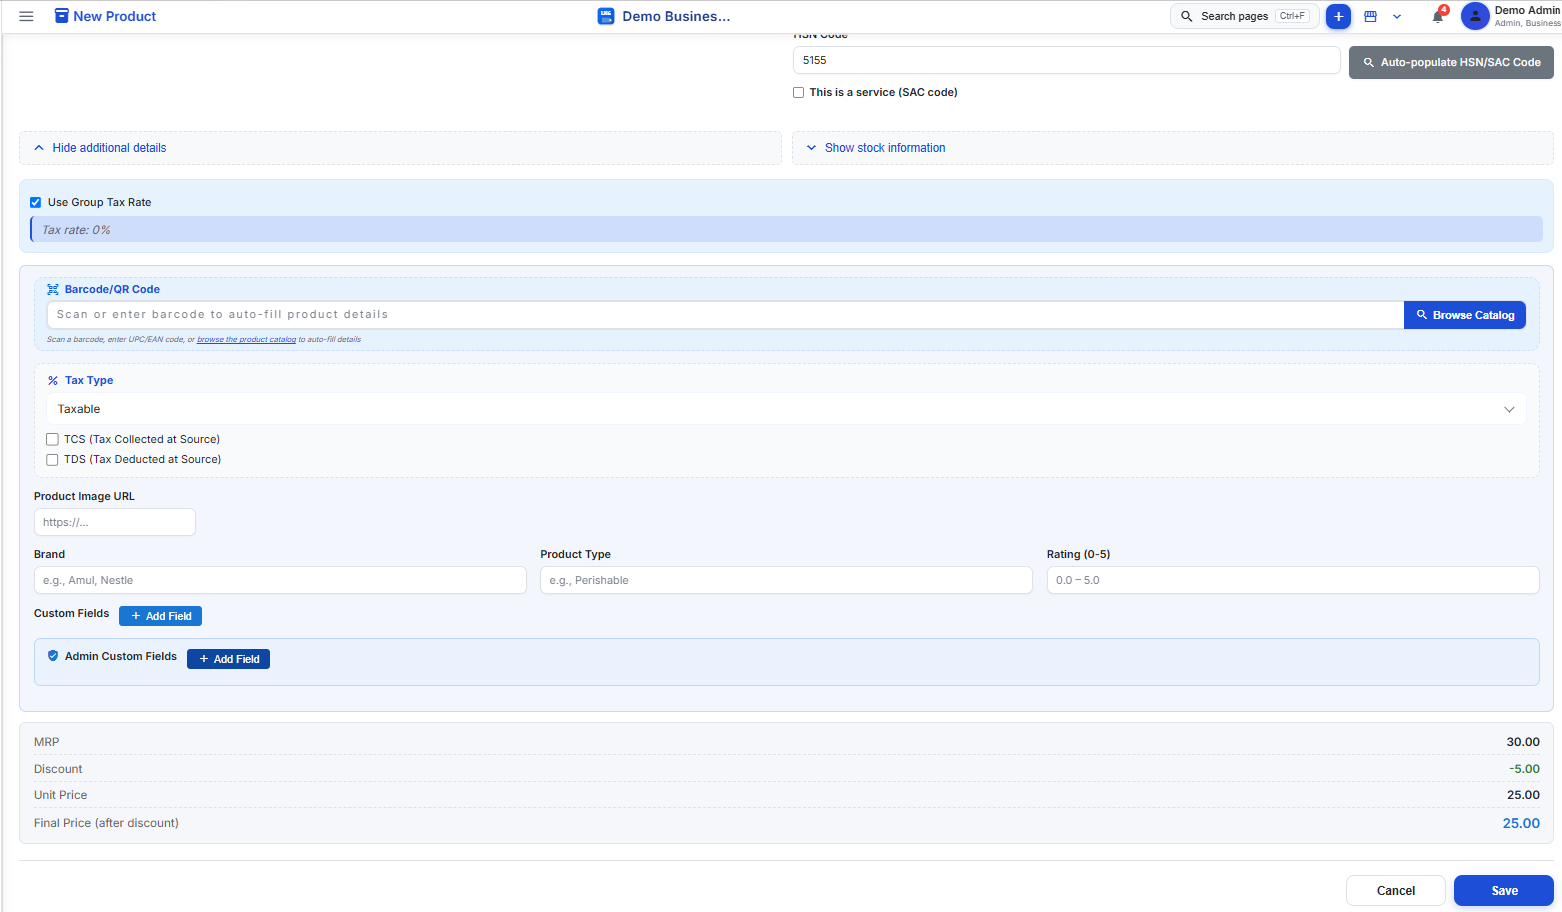
Once saved, the product is immediately available in the product search panel and Excel mode when you're billing — no extra sync step, no separate publish action.
The discount field deserves a closer look if you regularly run promotions or offer standing discounts to certain customer types. Setting a default discount here means every invoice that includes the product starts with that discount already applied — staff at the counter don't need to remember which items are on offer or manually type a percentage on each line. You can always override it on an individual invoice if a specific sale needs a different number.
For more on the full range of fields available and how they interact with inventory, see the create product documentation.
Why It's Worth Getting Right the First Time
A product entered with the correct category, unit, HSN code, and pricing saves you rework on every single invoice that follows. Skipping the HSN code, for example, means either leaving it blank on invoices (a compliance gap) or typing it manually each time — exactly the friction the catalog is meant to remove. The few extra seconds spent on the additional details screen pay for themselves the first time you bill that product.
Adding Products in Bulk
Adding one product through these two screens is straightforward, but setting up a full catalog of a few hundred SKUs one at a time isn't realistic for most businesses. For that situation, bulk import lets you bring in your entire product list — names, categories, units, pricing, and HSN codes — in one pass, rather than repeating this flow product by product. It's the practical starting point if you're migrating from a spreadsheet or another billing tool and want your catalog ready before your first day of billing.
Start Building Your Catalog for Free
You don't need a paid plan to start building out your product list. LKG for Billing's offline plan is free forever — ₹0, no credit card, no expiry — and includes up to 20 products and 10 product groups, along with 10 invoices a month and 10 customers. Prefer the cloud? A free 30-day cloud trial gives you the same limits to try online. See the full comparison on the pricing page or go straight to download.
See It Live
For the interactive version of this walkthrough — with hoverable, numbered callouts directly on the screens — visit Screen Guides and try "Adding a product — step by step" yourself.
Related reading
- How to Create a GST Invoice: A Step-by-Step Screen Guide
- Free Billing Software: What You Actually Get
- GST Billing Software: The Complete Guide for 2026
- Product documentation
Ready to build out your catalog? Download LKG for Billing and add your first product in under a minute.